
 To make the ornaments shown in Quilting Arts Gifts, you need to make felted wool balls or you can buy pre-felted balls from the Artgirlz or Quilting Arts. I like to make felted balls myself because I can have fun playing with colors and shapes. How to make the felted balls is explained in the article, but it does not have photos with all the steps. So, for all you visual learners here's how I do it.
Warning: once you start making these it will be really hard to stop.
This is a great way to use up leftover yarn, by rolling golf ball size yarn balls as a base for the ball. Wind yarn into oblong shapes to get a berry shaped ball. I usually use wool yarn because I know it will felt better, but in a pinch I have used other yarns too. My favorite place to order roving is from Outback Fibers, the colors are gorgeous and the prices are very reasonable.
 Unwind a length of roving, while holding it in one hand, grasp the end portion with the other hand and gently pull off "tufts" roughly 5-6 inches in length. Spread the fibers into a thin flat layer with all the strands going in one direction. Pull off another tuft of roving and layer it on top of the first at a 90 degree angle. Repeat this process several more times, criss-crossing 4-6 thin layers.
 When lifting the blanket of roving there should not be thin spots or holes. Changing the colors of yarn in the layers will create a heathered multicolored wool ball.
 Close the roving covered yarn ball in your hand and bring it to the foot of a knee hi panty hose. (buy cheap ones at the dollar store, or use those ancient ones in the back of your hosiery drawer that you never wear anymore) Gently remove your hand from around the ball and tie and knot a small piece of yarn around the hose to secure the ball in place.
 When all the balls have been wrapped in the hose, place them in the washing machine, set the water to lowest level and hottest setting. Add a small amount of detergent, about a tablespoon, the exact measurement is not crucial but soap is important in the felting process. I usually run it on a long cycle, the more agitation the better the felting. Good old fashion top loading washers have the most success with felting.
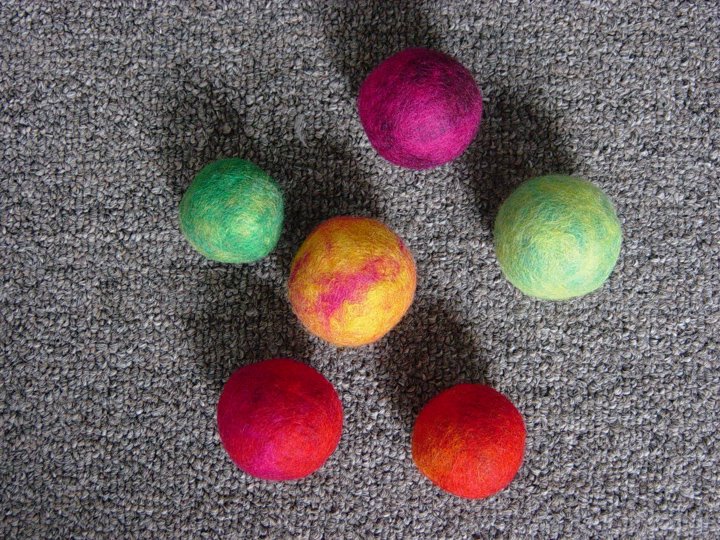
When you take the chain of balls out of the machine, you will see little fibers have come though the mesh of the hose. Snip the tied yarn between the balls, gently peel away the hose removing the ball and roll the ball in your hands to smooth the fibers.
Click here to watch a video tutorial for making felted balls.
 These would make great cat toys but dogs will want to shred these to smithereens. My chihuahua thinks there is nothing more fun than stealing felted balls when I am not looking and peel all the fuzz off.
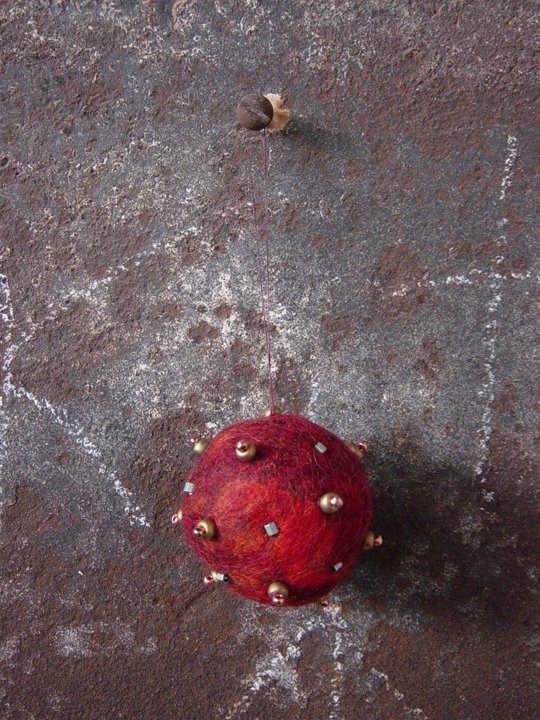
These are some of the ornaments I have made adding wool felt, embroidery floss and beads.


can you make felted balls out of scraps of 100% wool yarn and then put them into a stocking and wash also?
ReplyDeleteI have never tried that, but it should work. I bet it would be fun and speckly. Why don't you give it a try and let me know how it goes?
ReplyDeleteMixing in bits of wool yarn with the roving would work really well too, it would hold the individual fibers in place as it is wrapped around a yarn ball.
Where do I purchase the roving?
ReplyDeletemy favorite place is
ReplyDeleteoutbackfibers.com
Beautiful colors at really good prices.
I've tried to make these but the balls are pretty soft, despite my tight inner woven yarn balls. Are they supposed to have some softness to them?
ReplyDeleteHi Jessica,
ReplyDeleteThey are a little softer than the felted balls that you can buy, which makes them better for stitching.
When I roll my yarn for the centers, I do not roll them too tight, I try to roll the centers about the same as rolling a ball from a skein of yarn, with out too much stress on the fibers. Because I want the center yarn to felt as the roving on the ball felts. If the centers are rolled too tight, not enough movement will happen between the fibers and I don't think the roving makes as good a bond with the inner yarn ball.
The other issue could be how strong the agitation is from your washing machine. I have heard front loaders do not felt very well, too gentle on the clothes, so those good old top loaders still do something better, lol.
This is brilliant! Thanks for having the how-to up here!!!
ReplyDeleteI did a search on how to do this process and your blog came up. Your tutorial is brilliant and I love the ornaments that you created. Thank you for sharing this with all of us. I can't wait to try it!
ReplyDeletethank you for the helpful tutorial. as holiday season is 'round the corner. i am excited to begin the adventure of having a handmade tree. these will be perfect as the base of ornaments. thanks for sharing.
ReplyDeletepeace,
hillary
What do you use for 'hangers'? I want something a little lower profile than ribbon, but when I've used thread for mine, it twists miserably, creating a tangled mess in my box of stored ornaments.
ReplyDeleteHi Leah, I have always used the embroidery floss that I was stitching the ornament with. It doesn't seem to twist like thread and feels like part of the ornament.
ReplyDeleteI haven't made these balls but I have done a fair amount of felting of knitted items (slippers, oven mitts, etc) & one other thing that I have found helpful is to use a washer's heavy duty cycle if it has one. Also, I throw 3 tennis balls into the washer with the items to be felted. Both increase the amount of agitation & that is what makes for successful felting.
ReplyDeleteI've just discovered your excellent tutorial. Thank you so much for sharing this information!
ReplyDeleteOh my goodness, you can make so many wonderful things with felt balls. I need to make some soon. I found an 8 color pack of roving for 15.99. Is that a good price? I thought it could be since the singles were 2.99. I'm just not sure.
ReplyDelete$15.99 might be a good price, a lot of it depends on the total weight of the bag, quality of the wool and of course the colors. I often see bags with colors that are kind of muted, I really like the bright deep colors myself, so I can be kind of picky. For years, I have bought roving from
ReplyDeletehttp://www.outbackfibers.com/superfine/superfine_mixedbags.htm
I love her roving, beautiful colors and she will custom mix a bag for you from the 50 colors she creates.
What an awesome idea, I tried making felt balls one by one and took so much time! Definitely going to try your method, thanks for sharing!
ReplyDeleteSo beautiful and thanks for such a great detailed tutorial. I think these would make great gifts for Mother's Day for little ones.
ReplyDeleteI used your tutorial here to make my own felted balls last weekend... and I LOVE THEM! The contrast of the shiny balls and felted balls on my tree is so nice. Thanks so much for your ideas and help!
ReplyDeleteI am glad you found the tutorial helpful Foxy. These ornaments make great hostess gifts for all those holiday parties too! Happy holidays!
ReplyDeleteShould the yarn at the center of the ball be wool yarn, or can it be acrylic?
ReplyDeletekatie,
ReplyDeleteI think that wool is ideal because it will felt into the surface roving better but it will work with either, I have used up many oddballs of scrap yarn that way.
These are gorgeous!
ReplyDeleteFront loaders work perfectly. I have been using this method of making balls for a couple of years now and have only ever had a front loader. I put the balls in with laundry on a hot wash and they come out just fine!
Oh great to know! Thanks for sharing that felt fusion.
ReplyDeleteThank you so much for this tutorial. I just made my first felt balls (in a front load machine by the way) and they turned out perfectly!! Can't wait to make more.
ReplyDeleteHello! Just found this post, they look great! About how many balls do you expect you could make using an 8oz mixed bag from outback fibers??? Thanks!
ReplyDeleteHi Lisa,
ReplyDeleteit is a little hard to say how many balls you would get. It sort of depends on how big you make them and how much roving you use for each ball, but I would guess that you should get at least 50 golf ball size balls from an 8 ounce bag. Using waste yarn in the center really helps the roving to go farther.
WOW!
ReplyDeleteJust saw this technique on here...Since I don't have any roving, I'm going to try it using scraps of wool yarn, old sweaters, and wool skirts that I already have. Experimenting is half the fun!
My 6 cats will love the new toys!
You rock!!!!
I have a front-load HE washer - is there anything that I need to do differently for that step in the process? Thanks
ReplyDeleteHi Alie,
ReplyDeleteI don't think so. I have had people tell me the felted balls come out fine using a front loader.
Your ornaments are brilliant! Very nice work. Thank you for the tutorial. I had no idea that there was roving involved. Good thing I "googled"!
ReplyDeleteThanks Adrienne,
ReplyDeleteI also have made a video tutorial making the felted balls since I originally wrote this blog post, I have now added a link in this post, if you want to check it out.
Thanks for the great tutorial. The weather is damp here at the moment - could I put the balls through the dryer? and will the hosiery melt?
ReplyDeleteHi Jenny,
ReplyDeleteyou can definitely put them in the dryer, I usually do, just remove them from the pantyhose first.
this may be a stupid question but do you use the spin cycle, thanks, al
ReplyDeleteI let them go through a whole wash cycle including the spin cycle, the agitation is what creates the felting. Have fun!
ReplyDeleteHi! I found you via Pinterest and had to let you know how much I love your tutorial! I just tried it today, in my front loader and it worked perfectly! I threw one pantyhose full of 5 balls tied off in between with one blanket and a little soap and used a hot water cycle and they are perfect! Much better than several other ways I have tried.
ReplyDeleteI did find that the pantyhose had several small tears, but that may be because they were an old pair and I was not real patient pulling the felt balls out.
Thanks so much!!
What a great tutorial, thanks!
ReplyDeleteI just had a bit of a problem getting the pantyhose off. It seems to be felted onto the ball. Any suggestions on how to avoid that? Thanks
The fibers will migrate through the pantyhose, that's normal, you just carefully peel the ball out of the hose. If it's very bad, you could try a shorter wash cycle. There's a video showing how I felt the balls in my felted pumpkins post, if you are interested in seeing how mine usually come out from the washer
ReplyDeletehttp://paintedthreadsprojects.blogspot.com/2010/10/making-felted-pumpkins-tutorial.html
Hello. I was just curious. I have a lot of wool felt sheets leftover from various art projects and was wonder if that could be pulled apart and used for this? Is there anything else that can make for a good center, or is wool yarn the best way to go?
ReplyDeleteI would think if the wool felt fibers are fairly well shredded then wrapped with yarn, it could work. I've used wool yarns and synthetic, both will work but I think wool is better because the fibers will felt together where as other fibers don't. My process has been trial and error, so I say try it and see how it goes :-)
ReplyDeleteHello again! I must have been wrong, the felt was shredded quite well but didn't bond at all. However the shredded yarn worked beautifully and I now have a cute little white and green pumpkin after following your other tutorial. Thanks for all your help, Judy!
ReplyDeletethanks for leaving a comment with your results. As I think about it, wool felt often is made with quite a bit more rayon than wool, rayon does not felt, so that would not give it very many fibers to mesh and felt together.
ReplyDeleteI'm glad to hear the shredded yarn worked well for you though. Now you're going to be hooked and wanting to make felt balls all the time, cause they look and feel so darn nice! :-)
These are amazing instructions and I can't wait to try them!
ReplyDeleteWhat's the smallest size you can do with these? I need them less than an inch in diameter, and I think the nylons may be an issue with that.
Straycat
ReplyDeleteI've never made them smaller than a golf ball. I think most people do it by simply rolling the roving in their fingers, but I suppose if you wanted something in the center to give it shape you could probably use little pompoms or something. Good luck ;-)
Fantastic! This is so easy! Just made a perfect pair of felted wool balls :)
ReplyDeleteOh my goodness! I love these! I am looking at the roving and was wondering how much do you generally use for each ball? This is all new too me and I don't want to order too little or enough to last me 10 years! :)
ReplyDeleteOne skein of roving the size I show in the photo would probably cover 5-6 balls. You can use roving for a number of felting projects so if you got a bag of assorted colors from Ouback fibers, I doubt it would go to waste.
DeleteGreat idea, how could I make hollow ones? Put a treat inside and a little handle to hang on the tree?
ReplyDeleteOnce the dog shreds it can you refelt the shreds back into a ball again?
ReplyDeleteThis comment has been removed by a blog administrator.
ReplyDeleteBeautiful
ReplyDeleteHow many ball can you make from one bag.
ReplyDeleteHow much "roving" would one ball need? I see 1/5 oz of roving on the site you recommended - wonder how many balls that would make?
ReplyDelete